Now a days cloud hosting is popular among many users, a lot of people like to host their data on the cloud so they can access it from different devices or from other locations. Cloud hosting made things a lot easier than it was before, in past you had to carry USB/CD/DVD/HDDs with you for data transfer. By using Cloud you can simply upload your data and access it from any device using Internet. Here comes another great your own personal cloud, which means you don't have to pay anyone in order to host you data and you can store your data in your server and access it using ownCloud from any device and from anywhere.
ownCloud is a free software released under AGPLv3 licence which is quite similar to Dropbox but it is more than that, the big difference between ownCloud and other services is that it is completely free and open-source, and thereby allowing anyone to install and use it without any kind of charges on a private server, without any limited storage space (depend on hard disk storage) or number of connected users. The ownCloud server is written in the PHP and JavaScript scripting languages. For remote access, it employs SabreDAV, an open-source WebDAV server. ownCloud is designed to work with several database management systems, including SQLite, MariaDB, MySQL, Oracle Database, MSSQL and PostgreSQL.
In order to synchronize files with their ownCloud server, desktop (For Linux, Windows, and Mac OS X) and mobile (Android and iOS) clients are available. Files and other data (such as calendars, contacts or bookmarks) can also be accessed using a web browser without any additional software. Any updates to files are pushed between all computers or mobile devices connected to a user's account. Access, Sync and Share your data, under your control. ownCloud provides access to your data through a web interface or WebDAV while providing a platform to view, sync and share across devices easily-all under your control. ownCloud's open architecture is extensible via a simple but powerful API for applications and plugins and works with any storage.
Features:
- Smooth performance and easy user interface.
- File storage in conventional directory structures or via WebDAV.
- Encryption of user files.
- Synchronization of clients running Linux, Windows (Windows XP, Vista, 7 and 8), or Mac OS X (10.6 or better).
- Calendar (also as CalDAV)
- Task scheduler.
- Address book (also as CardDAV)
- Music streaming (through Ampache)
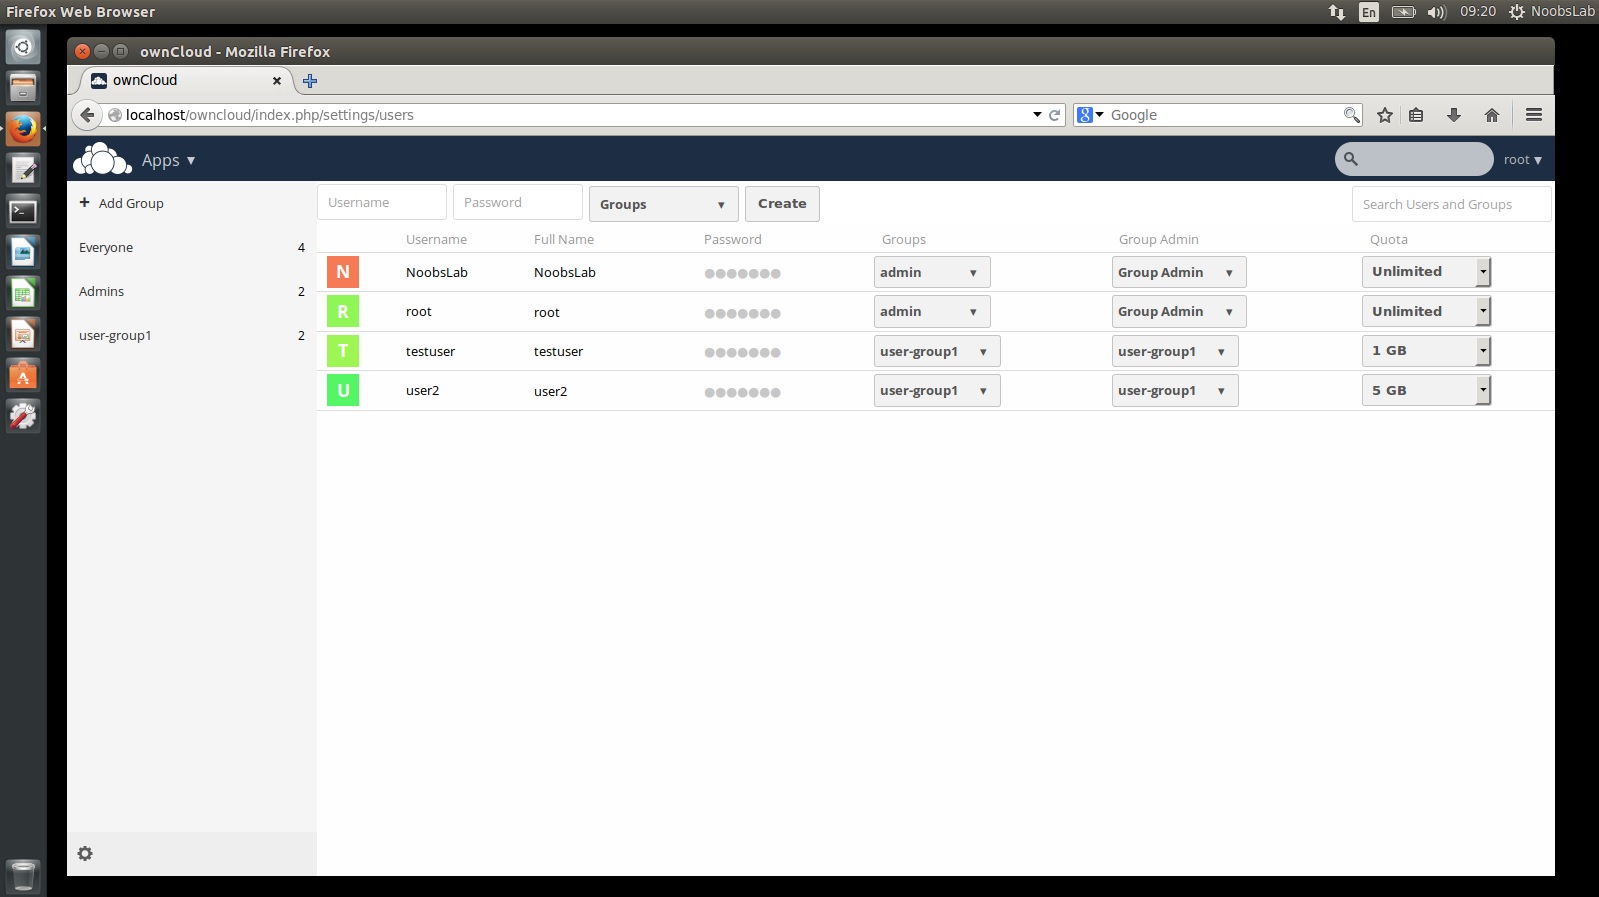
- User and group administration (via OpenID or LDAP)
- Sharing of content across groups or public URLs.
- Online text editor with syntax highlighting and code folding
- Bookmarking
- URL shortening Suite
- Photo gallery.
- Video viewer.
- PDF viewer (using PDF.js)
- Viewer for ODF Files (.odt, .odp, .ods)
- Mozilla Sync hosting - If you are a Mozilla Firefox user, all history, form data, bookmarks etc. can be stored in your ownCloud server.
- Connecting external storages (If you have accounts on Dropbox, GoogleDrive, or Amazon S3, you can mount those storages into your ownCloud installation)
- Customizable with one-click-install apps.
- File editing and preview support for PDF, images, text files, Open Document, Word files and more.
- Integration of anti-virus scanning functionality with the anti-virus app.
- LDAP / Active directory integration
- Example files for new users. Preload a new user's Files area with, for example, a tutorial file, which appears when they first log in.
- Powerful integrated logging
- Fine-grained control over access to data and sharing capabilities by user and by group.
- Advanced quota management with configurable accounting of external storage.
- Sharing REST API. Control sharing from mobile apps and desktop clients
- Easy development of 3rd party apps with the share REST API. Quick access to core functions for app development with the powerful ownCloud App API and webhooks following the publication / subscription model.
Now ownCloud server packages to our PPA for all current Ubuntu versions and its derivatives, so now you don't have to worry about other installation methods for ownCloud server. PPA contains latest stable release and we didn't touch any of the original files of ownCloud, you are free to audit our PPA packages. Checkout changelog of current version.
Available for Ubuntu 15.04 Vivid/14.10 Utopic/14.04 Trusty/12.04 Precise/Linux Mint 17.x/17/13/other Ubuntu derivatives
To Install ownCloud in Ubuntu/Linux Mint open Terminal (Press Ctrl+Alt+T) and copy the following commands in the Terminal:
Add Repository in Ubuntu 15.04 Vivid/Ubuntu 15.10 Wily:
Add Repository in Ubuntu 14.04 Trusty/Linux Mint 17.x:
Add Repository in Ubuntu 12.04 Precise/Linux Mint 13:
Now Run following commands to install owncloud:
Now follow this guide in order to configure ownCloud with in your network.
First of all set permissions for ownCloud using this command:
Now configure Apache:
Enable SSL (for encrypted connection) using these commands:
Now create self-signed certificate using this command:
Check your server IP address using ifconfig command, if you already know the IP address that is good then skip ifconfig command:
In this step configure Apache, run following command to open file in text editor(you can replace nano with your favorite editor):
Once file is opened copy and paste following code in the file (Don't forget to change your server IP address in the following file):
<VirtualHost 192.168.1.142:80>

#### Redirect to port 443 ###
RewriteEngine on
ReWriteCond %{SERVER_PORT} !^443$
RewriteRule ^/(.*) https://%{HTTP_HOST}/$1 [NC,R,L]
#### End of Redirection configuration ###

DocumentRoot /var/www/html/owncloud/
<Directory /var/www/html/owncloud>
    Options Indexes FollowSymLinks MultiViews
    AllowOverride All
    Require all granted
</Directory>

</VirtualHost>

<VirtualHost 192.168.1.142:443>

####Configuration for SSL #####
SSLEngine on
SSLCertificateFile /etc/apache2/ssl/owncloud.pem
SSLCertificateKeyFile /etc/apache2/ssl/owncloud.key
#### End of SSL Configuration ####

DocumentRoot /var/www/html/owncloud/
<Directory /var/www/html/owncloud>
    Options Indexes FollowSymLinks MultiViews
    AllowOverride All
    Require all granted
</Directory>
</VirtualHost>
Restart Apache using this command:
For now everything is set, now open web-browser on the same machine and type one of the following address in order to check ownCloud is working.
http://127.0.0.1/owncloud
http://localhost/owncloud


Now follow these step to make ownCloud accessible inside your network.
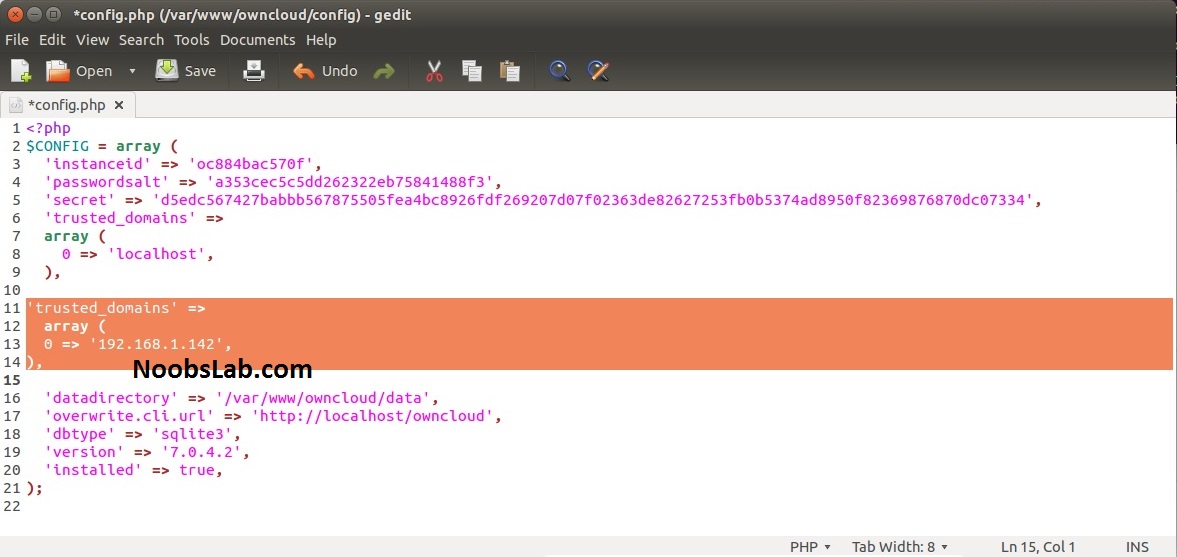
Now you need to add your server IP address in config file as trusted server. Enter these commands in terminal to make backup of config file and open file in text editor(you can replace nano with your favorite text editor).
Now copy following text and paste in file before 'datadirectory' => ..... line. Once you paste change 192.168.1.142 IP address to your IP because it is just an example.
'trusted_domains' =>
array (
0 => '192.168.1.142',
),
or further more you can add additional address:'trusted_domains' =>
array (
0 => '192.168.1.142',
1 => 'server.domain.com',
),
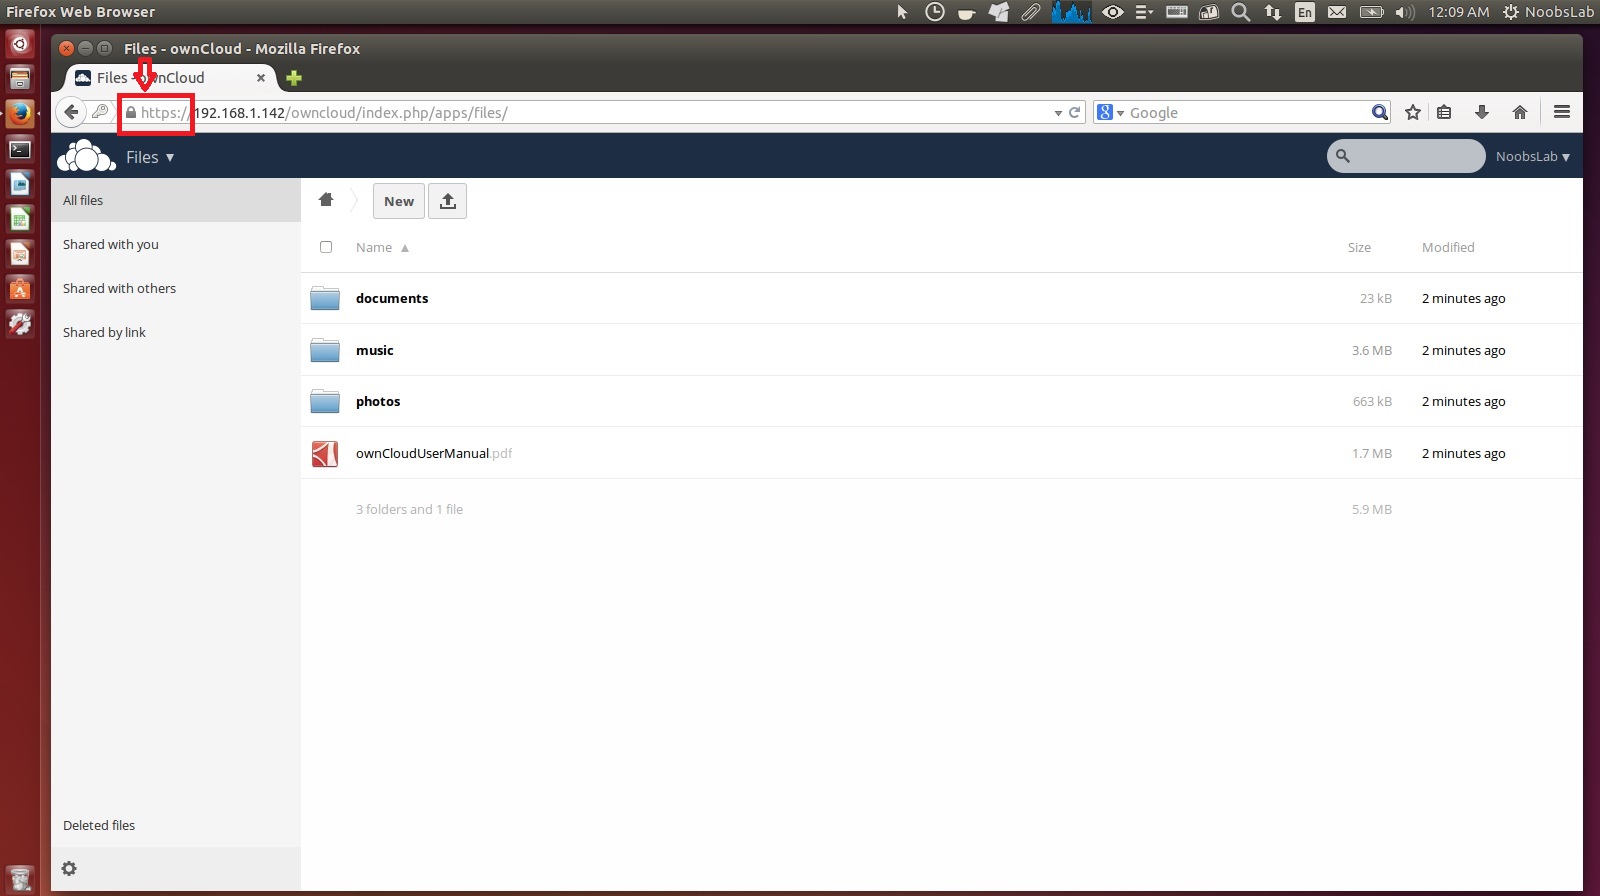
Finally! inside your network access owncloud from other machine using server IP address, for example: 192.168.1.142/owncloud or https://192.168.1.142/owncloud

To access ownCloud from outside of your network use port-forward option from your router and access ownCloud using your external IP address. For example you set 8080 port to ownCloud machine and your external IP is 111.111.111.110, so in order to access ownCloud from outside of your network you have to use this kind of address 111.111.111.110:8080/owncloud
ownCloud client is already available in Ubuntu repositories, you can install client using this command in Ubuntu/Linux Mint or download client for Windows/Mac/Mobile using ownCloud site.