Articles by "grub"
Showing posts with label grub. Show all posts
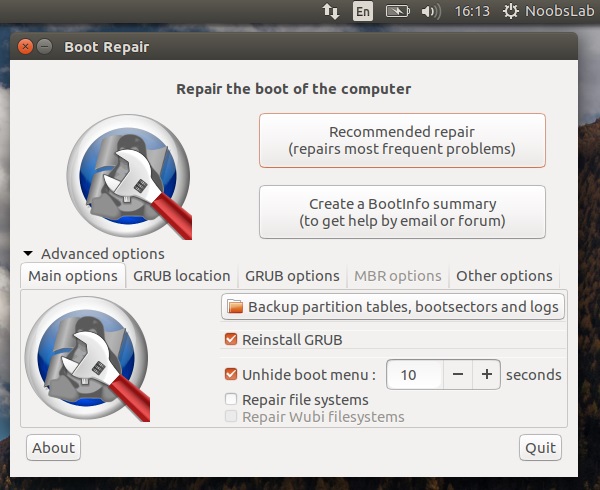
Boot-Repair is around from quite sometime, released under license GNU-GPL and it is great tool to fix the issues with your Grub and Boot, it repair frequent boot issues you may encounter in Ubuntu like when you can't boot Ubuntu after installing Windows or another Linux distribution, or when you can't boot Windows after installing Ubuntu, or when GRUB is not displayed anymore, some upgrade breaks GRUB, etc. Boot-Repair lets you fix these issues with a simple click, which (generally re-installs GRUB and) restores access to the operating systems you had installed before the issue.
Boot-Repair also has advanced options to back up table partitions, back up bootsectors, create a Boot-Info (to get help by email or forum), or change the default repair parameters: configure GRUB, add kernel options (acpi=off ...), purge GRUB, change the default OS, restore a Windows-compatible MBR, repair a broken filesystem, specify the disk where GRUB should be installed, etc.
Boot-Repair will create a Ubuntu pastebin link for you to share that allows experienced members to see what's wrong with your boot. Ubuntu's Pastebin is not easily indexable or searchable, and purpose of the tool which creates this page (Boot-Info) is meant to be a very helpful solution to the problem.

  • Easy-to-use (repair in 1 click ! )
  • Free (GPL open-source license)
  • Helpful (Boot-Info summary to get help by email or on your favorite forum)
  • Safe (automatic backups)
  • Reliable (400.000 users per year)
  • Can recover access to Windows (XP, Vista, Windows7, Windows8, Windows10).
  • Can recover access to Debian, Ubuntu, Mint, Fedora, OpenSuse, ArchLinux...
  • Can recover access to any OS (Windows, MacOS, Linux..) if your PC contains Debian, Ubuntu, Mint, Fedora, OpenSuse, ArchLinux, or derivative.
  • Can repair MBR-locked OEM computer boot if the original bootsector has been saved by Clean-Ubiquity
  • Can repair the boot when you have the "GRUB Recovery" error message
  • Options to reinstall GRUB2/GRUB1 bootloader easily (OS by default, purge, unhide, kernel options..)
  • and much more ! (UEFI, SecureBoot, RAID, LVM, Wubi, filesystem repair...)

Available for Ubuntu 16.10 Yakkety/16.04 Xenial/14.04 Trusty/12.04 Precise/Linux Mint 18/17/13/other Ubuntu derivatives
To install Boot-Repair in Ubuntu/Linux Mint open Terminal (Press Ctrl+Alt+T) and copy the following commands in the Terminal:


Did you find this utility useful?
Burg is boot loader forked of GRUB loader. It uses a new object format which allows it to be built in a wider range of OS, including Linux/Windows/OSX/Solaris/FreeBSD, etc. It also has a highly configurable menu system which works in both text and graphic mode. Additional features like stream support and multiple input/output device are also planned for BURG. BURG features superior theming and has a highly configurable menu system which works at boot time in both text and graphical mode. Since BURG is derived from GRUB, its configuration is similar in most respects. The main configuration file is /boot/burg/burg.cfg and is usually generated automatically. You can create one by yourself or use grub-customizer to modify BRUG entries and other stuff. You can even design theme for BURG checkout this link for more details about BURG.
burg
Install Grub Customizer 3.0.4 in Ubuntu 13.10/Ubuntu 13.04 Raring/Ubuntu 12.10/Ubuntu 12.04/Ubuntu 11.10/Older Ubuntu Version/Linux Mint 14/13/12/11 and previous Mint version

Grub Customizer - a new graphical GRUB 2, You can now select the default boot entry, change the menu visibility and timeout, set kernel parameters, disable recovery entries and change screen resolution (GFX_MODE) - all by using Grub Customizer.

>>> Latest Update <<<
Install Grub Customizer 3.0.2 in Ubuntu 12.10/Ubuntu 12.04/Ubuntu 11.10/Older Ubuntu Version/Linux Mint 14/13/12/11 and previous

Grub Customizer - a new graphical GRUB 2, You can now select the default boot entry, change the menu visibility and timeout, set kernel parameters, disable recovery entries and change screen resolution (GFX_MODE) - all by using Grub Customizer.

What's new and bugs fixed:
  • crash if blkid prints devices without UUID... fixed
  • compiler problem fixed (new GCCs)
  • translation updates
  • entries can be moved free now
  • integrated settings dialog
  • new partition chooser
  • context menu
  • multi selection
  • trash instead of checkboxes
  • entry editor
  • graphical error handlung
  • reset functionality
  • warning when trying to remove script- or system entries

To install Grub-Customizer in Ubuntu/Linux Mint open Terminal (Press Ctrl+Alt+T) and copy the following commands in the Terminal:

Download Source Code from here for other Distro's
That's it
Install/Recover Grub2 from Linux Live CD/USB after installation of other Operating Systems (Windows xp, Vista, 7, 8) or Grub doesn't load
grub

Recommended Live CD's (Ubuntu 12.04/11.10/11.04/10.10/10.04/9.10/9.04/Mint)
Recover/Reinstall/Repair grub2 from Linux Live CD/USB after Windows 7/8/vista/xp or grub doesn't work, It is really easy to install grub.
You just have to follow simple steps after that you will see grub2 in your system again.


First of all Boot your Linux Live CD/USB then open Terminal  and enter following commands:
This command for root permissions:

Check the drives number in Partition Manager :

Now select your Linux installed drive and change the number in following commands (Only change 'x' with your drive number) and change (sda) with your hard drive it can be (sdb, sdc, etc) you can see this in Partition Manager:

This command will change mnt directory permissions to root permissions:

Now grub install command and Change 'a' in "sda" with your hard drive where you want to install grub, check in Partition Manager:

Now installation finished, Enter following commands to unmount (If these two command doesn't work, then leave them):

Now reboot your pc:
Your grub is back. That's it.
Install Grub Customizer 3.0 in Ubuntu 12.10/Ubuntu 12.04/Ubuntu 11.10/Older Ubuntu Version/Linux Mint 13/12/11 and previous

Grub Customizer - a new graphical GRUB 2, You can now select the default boot entry, change the menu visibility and timeout, set kernel parameters, disable recovery entries and change screen resolution (GFX_MODE) - all by using Grub Customizer.


What's new and bugs fixed:
  • add grub customizer to ubuntu official repo
  • few strings not translatable
  • G.C. removed both entries for a kernel when I unchecked only 1
  • Unbuntu Entries Gone from Grub after Ubuntu 11.10 installs updates
  • Won't customize grub2 on flash drive
  • Grub-customizer fails to load configuration when starting application
  • GRUB Customizer 2.5.5 (GC) generates file grub.cfg with error in command gfxmode
  • update-grub#: command not found
  • Can't select non-system partition for grub
  • application does not update; only default grub menu appears
  • Incorrect FSF address in sources
  • gfxmode vga=788 is depreciated

To install Grub-Customizer in Ubuntu/Linux Mint open Terminal (Press Ctrl+Alt+T) and copy the following commands in the Terminal:

Download Source Code from here for other Distro's
That's it, Enjoy
Previous I shared how to Easily Reset your Linux User account password from grub. After that post many people wrote me so Linux is really unsecured (How we can protect this?). So it is not a big issue to secure grub or how to secure your user account in Linux. So I decided to make a tutorial on 'grubpass' utility, which can protect your grub entries. Nobody can bypass grub2 without enter grub username and password. Ya it's looks like awesome utility. Grubpass 1.2 version utility uses password encryption to protect.

So Now we start how to protect grub entries with password. I have uploaded to dropbox so it is easy to download and install. You also can download deb package and tar.gz package from Author Page.

To Install it on Ubuntu/Linux Mint open Terminal (Press Ctrl+Alt+T) and enter the following commands in the Terminal:


Now start Grubpass with following command:


How to use Grubpass see ScreenShots: (click image to enlarge)

1: Installation Complete
grub2 password

2: Start GrubPass
grub2

3: How to set password
Protect grub2

4: Create username for grub
grub2 secure

5: Follow password steps in-order to set password on grub entries
ubuntu grub2

6: Apply password on specific or all grub entries
grub2

7: Finally you are done
grub2


How to Remove Password from Grub Entries?

It is really easy just enter following command and see ScreenShots.
  • sudo grubpass
1: Now enter recover (See picture)
grub2

2: Finally enter yes/no
fedora grub

For other Distro's see Author Page.

Remove Entries from Grub/Grub2 in Ubuntu/Linux Mint/Other Linux Distro's

remove entries grub


Easy way to remove Unwanted entries from grub/grub 2 in Ubuntu/Linux